
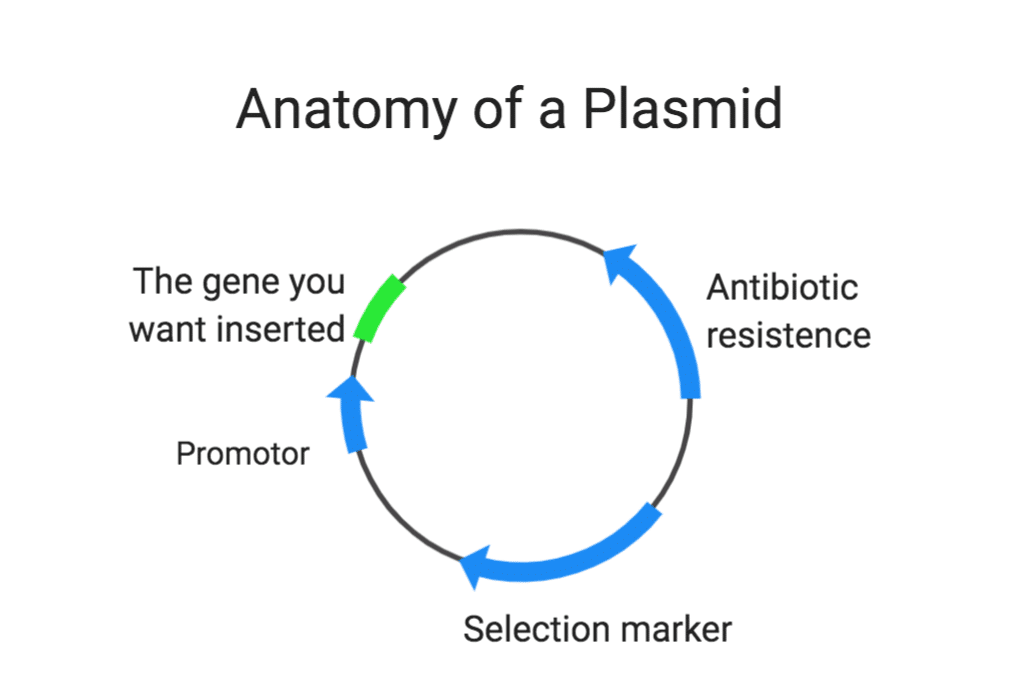
Plasmids are a key tool in molecular biology. These circular pieces of DNA, also called “vectors” or “constructs”, can be engineered to contain large made-to-order stretches of synthetic DNA. We design plasmids when we need to insert large stretches of synthetic DNA into the genome to create a model organism expressing, for instance, a fluorescent protein or an exogenous gene. They are the starting material for any large gene edit. Creating the right plasmid is a foundational step that applies to both our C. elegans and Zebrafish genetic modification processes.
Because the plasmid is used to instruct the host animal’s cells in how to code for, and ultimately express, new genetic material and proteins, it’s very important to check that the sequence is correct before we try to insert it into the animal. We call this process plasmid validation. By ensuring good quality control of the genetic starting material before we even touch the animals, we eliminate further complications related to sequence errors downstream. After all, it would be a shame to go through all the hard work of creating a transgenic line, only to discover there was a critical error in the sequence that created an early stop codon! To avoid this, we rigorously check the sequence of the plasmid before moving forward with the project. Below, we walk you through our process for validating plasmids.

STEP 1: Design & Construct the Plasmid.
Before we can verify, we have to get starting material. Plasmid design and construction are nuanced processes that deserve their own blog post…but it isn’t this one! In short: plasmids are designed using and in silico informatics platforms (we like Benchling) and are either built in-house or obtained from synthetic DNA providers. To begin verification, lyophilized plasmids are resuspended in molecular biology grade water to reach the final concentration of 200 ng/μL.
STEP 2: Grow the Plasmid.

Around 5 – 10 ng of plasmid concentration is used in the bacterial transformation using DH5-alpha Competent Escherichia coli and specific antibiotic media (Ampicillin, kanamycin, carbenicillin, etc.).
Each plasmid build contains a specific antibiotic resistance within the construct that will be utilized for selection during growth. Competent cells in the transformation process are highly effective in incorporating the foreign DNA once their cell walls are altered so that DNA can pass through more easily.
After overnight incubation at 37°C, bacterial colonies appear white and fairly circular in the antibiotic-resistant Petri plates. Each circular colony should represent an individual bacterial cell that has divided repeatedly, and the resulting cells have accumulated to form visible colonies.
Four distinct colonies are picked from the plate. We can increase the probability of selecting the correct bacterial colony carrying the gene insert avoiding the yeasts, molds, or other fungal colonies by choosing four distinct colonies. Care is taken to avoid satellite colonies which might be false positives by picking colonies that are distinctly separated from each other. Following that, by using sterile techniques, the colonies were grown overnight in the respective bacterial liquid culture medium (Lysogeny broth media and a resistant antibiotic) at 37°C with 250 rpm shaking.
STEP 3: Select a Plasmid.
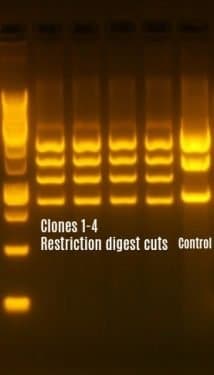
A high concentration of purified plasmids is obtained from the bacterial culture by plasmid purification process. Restriction digests are set up to check the gene insert along with the vector backbone in all four plasmid extracts. Usually, 1 hour incubation time is sufficient because we generally use “High-fidelity” and “Time-saver enzymes”. Along with the appropriate enzymes, diagnostic restriction digest performed in a 1μg of the purified plasmids, we will observe the different band sizes confirming the gene of interest along with the vector backbone.
Gel electrophoresis is performed to verify the restriction digest cuts. This helps in selecting the specific plasmid which produces bands of the expected size based on the restriction digest cutting pattern.
STEP 4: Sequence the Plasmid.
Sequencing primers are designed to cover the gene insert and its backbone. Usually, we choose a primer length around 18-24 base pairs, a GC content between 40-60%, and melting temperature (Tm) between 55–65°C.
The plasmid samples are prepared and diluted with molecular biology grade water to reach a plasmid concentration of around 40-50 ng/μL. Generally, we need to send 10 μL for a single primer reaction to our sequencing provider. In a few days, we get the sequencing results back.
The sequencing results are then imported into our design software and aligned to check the sequence read. If any point mutations, misreads, and sequence deletions are present in the sequence alignment, they are fixed using molecular biology tools. Clean sequence read alignments are stored and communicated to our customers. The results for an example plasmid are shown below.

After verifying the entire sequence read without mutations and misreads, we can proceed further downstream to the next process: C.elegans transgenics, zebrafish gene editing, and expression assays.
Validation may seem like a lot of work, but in the end it is a time saver. This is because proper verification of the plasmids prevents re-work steps in the transgenic creation process. Plasmid constructs without DNA sequencing might contain several mutations ranging from point mutations, insertion, and deletion mutations differing from the original construct. We can avoid unnecessary mutations at the expression level by validating the sequencing read before proceeding further downstream.
For our internal projects, we keep meticulous records and provide the sequencing verification of constructs to our clients. By taking these steps to verify the quality of our plasmids, we ensure that our customers always receive the desired gene-edited animal designed to their exact specifications.


