

With the advent of targeted nucleases like zinc-finger nucleases (ZFNs), TALE nucleases (TALENs), and clustered regularly interspaced short palindromic repeats (CRISPR) and CRISPR-associated proteins (Cas), zebrafish researchers were able to begin interrogating gene function and regions of interest with a precision that was previously out of reach. With these innovations, researchers could not only disrupt and delete DNA, but even knock in DNA into the genome of this already powerful, well characterized model born of the marriage between developmental biology and genetics (6). The era of making mutants and building transgenic tools with random insertion and mutagenesis methods was surely coming to a close as this new age of precision genome engineering dawned!
Alas, as is often the case, biology has had its way in the end. As highly skilled and diverse as the umbrella of zebrafish research has become, such precision modifications – knock-ins in particular – remain out of reach for many, from the greenest of novice technicians to the most seasoned of zebrafish geneticists. With so many tools at our disposal, and an increasing number of published examples of knock-ins making it seem relatively straightforward, why is it still so difficult? Why do so many skilled researchers toil at the bench for months, even years on these projects, often with little to show for it?
Read on as I discuss the biggest pitfalls, pain points and precautions our team has encountered at the bench and in the zebrafish community before you embark on your own knock-in odyssey.
1. Your sgRNA doesn’t actually cut as well as you think it should.
As my father told me countless times in the garage growing up: always measure twice and cut once. You can’t uncut that board, so it’s better to double-check your work first than to rush and regret it later. The same principle holds true when designing a CRISPR knock-in experiment. You want to start with good materials and reagents, and know as much as you can on the front end of your project before you end up months down the road, hunting down and troubleshooting any number of culprits in your workflow.
With little exception, you’re going to want to use an sgRNA that cuts your locus at a high frequency. Without this, the precise knock-in event you’re looking for – already a rare event – has even further diminished chances of taking root. In the best of outcomes, you’re already looking for a few needles in a giant haystack – why start with fewer needles? So, this means testing, ideally in vivo, the frequency at which your sgRNA actually cuts the genome. You may be tempted to rely on the prediction tools online, but be warned – there can be pretty poor correlation between the presence of a predicted cut sight and the in vivo cutting activity, especially if your background strain is highly divergent from the reference genomes utilized by the prediction algorithms.
Additionally, there is increasing evidence that in vitro synthesized (i.e. the D.I.Y. approach) sgRNAs have worse cutting efficiency than synthesized sgRNAs, meaning costs you may save on the cheaper DIY sgRNA synthesis may end up costing you in the end if they cut poorly and you fail to recover an edit (3).
For more on this, see our article on why in vivo sgRNA verification is so important.
2. Your donor repair template is too long (or short).
The next key step of the journey is in the donor repair template design. There is no one-size-fits-all solution here! Got a small edit? You likely need to use a small ssODN as your template. Knocking in something big? You might need really long homology arms (800+ bp) along with the payload, so you need to create a plasmid.
Numerous studies assaying the editing efficiency of various forms of templates have uncovered that the integration efficiency and germline transmission rates of an edit vary widely from locus to locus (1, 2, 7). In other words, not all loci are created equally. Published methods are an excellent starting point, but keep in mind that you may need to revisit this step to get it right for your particular project (1, 2, 4, 9).
3. You injected into a late-stage embryo
You now have the high quality sgRNAs, a donor repair template cloned or synthesized, and a source for Cas9 mRNA or protein – now on to the injecting! Microinjection is a standard technique in the zebrafish research toolbox for introducing mutagenic reagents, chemicals, dyes and other reagents into fertilized zebrafish embryos (5). Indeed, your research institution may even have a core facility or dedicated staff that can perform these experiments. It is important to start off your experiments with high quality injections to ensure the best chances of success – cut early and cut often. This means injecting into or near the single cell stage of your embryos, and titrating your injection mix to introduce enough of each component to induce robust genome cutting and repair without such high levels that none of the embryos survive, which may take a few tries to achieve (1). Equally important here is the need for robust husbandry in the nursery, or sufficiently high submission numbers in its absence, to ensure adequate yield of viable adults for screening once the animals reach maturity.
4. You submitted a clutch without knowing whether your edit ever happened
No sense in using that often cramped facility space on fish that have no detectable edits in the first place! One way to curtail the cost and time to find an edit is to design a set of reagents for detecting integration of your edit in the soma of injected embryos before you even bother submitting to the nursery. Gather as much data as you can as early as you can to avoid wasted effort later on.
Before you submit injected embryos to the nursery for rearing, we recommend sampling the injected clutches by collecting a subset of embryos for PCR-based screening. You can use programs like Synthego’s ICE Knock-In Analysis tool for detection of precise knock-in edits, or design your own allele-specific primers to look for the presence of your desired edit (9). This will help to ensure that you have generated animals with some detectable frequency of knock-in integration before you invest 2-3 months rearing these animals and subsequently screening them.
5. You threw away founders transmitting precise edits
This is probably this most painful mistake! While it may seem straightforward, detecting precise edits once you begin screening your mosaic founders for germline transmission can be one of the biggest challenges of the entire journey. Without a robust screening workflow, you may miss your valuable founders transmitting precise edits due to poor sampling and detection methods. Whatever methodology you are comfortable with, we have found it immensely helpful to utilize multiple methods to screen for and identify edits, including allele-specific PCR, high resolution melt analysis, restriction fragment length polymorphism, Sanger sequencing, and other various techniques to account for different detection sensitivities in different methods.
6. You got more than you bargained for
One reason that we recommend utilizing multiple methods to confirm the presence of an edit is that you will – with little exception – identify imprecise edits that may appear precise by a given assay. For example, in an impressive show of force, Boel et al. documented extensive rearrangements and complex insertions at target loci, shedding further light on the underlying biology of precise knock-in editing and its complications in zebrafish (2). Additional studies in mice as well as cell lines from mouse and human have yielded similar findings, further highlighting the complexity of biology underlying knock-in editing and emphasizing the need for better mechanistic insight into the nuances of CRISPR/Cas9 gene editing in general, especially with respect to disease modeling and other biomedical applications (2, 6, 10).
Suffice it to say, making knock-ins is not an easy lift, even for the most skilled of genome engineers out there. However, if you equip yourself with the proper tools, information and materials on the front end of your gene editing odyssey, you will greatly improve your chances of success. It’s not that you need to reinvent the wheel – some of the methods described here are very much old school in nature – but minor course corrections early in the process will save you a lot of time, money and frustration later. I hope that in sharing some of these lessons, you will be able to set off on your gene editing voyage with just a little more confidence and success. Happy trails!
“There is nothing like looking, if you want to find something. You certainly usually find something, if you look, but it is not always quite the something you were after.”
― J.R.R. Tolkien, The Hobbit, or There and Back Again
Learn more about InVivo Biosystems zebrafish knock-in services. Take advantage of our Zebrafish Knock-In service today and unlock the power of genetic manipulation in your research. By leveraging the cutting-edge CRISPR technology, we offer a comprehensive and efficient solution for generating precise and targeted genetic modifications in zebrafish.

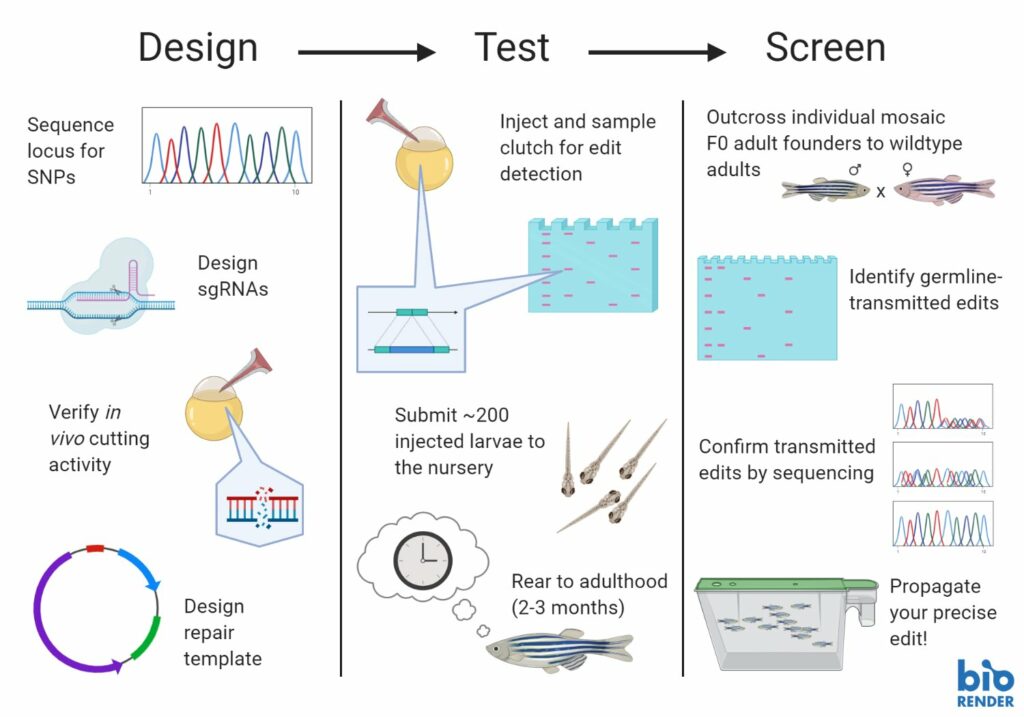
Download the infographic of 6 essential steps to a successful zebrafish knock-in project.